Learn Solidity: Introduction
Get started writing smart contracts on Ethereum today
Solidity is one of the most popular languages used for developing Ethereum smart contracts, so as someone who wants to be a blockchain developer, I decided to learn how to develop smart contracts using Solidity.
But since I couldn’t find a tutorial with the quality I wanted (one that makes it easy for a beginner to learn the basics in a concise way), I decided to create this series that I hope will introduce you to Solidity programming very quickly and effectively. Enjoy!
Set Up Development Environment
The IDE we will use is Remix. All you need to do is to type this URL. Once that’s done, you should see a screen that looks like this:

On the left side, I have selected the two main components. The first icon is the file explorer where you can see all your Solidity files, and the second icon is the plug-in manager from which you can add new plug-ins. We will need to add two plug-ins, so click on the plug-in manager icon and type “Solidity compiler.” Then activate it by clicking on “Activate” and do the same thing to add the “Deploy and run transactions” plug-in.
The “Solidity compiler” tab will allow you to configure the compiler parameters and compile your smart contracts, while the “Deploy and run transactions” tab will allow you to deploy your smart contracts in the blockchain and interact with them. The list of icons should now look like this:

The first thing you should do now is to check the auto-compile option in the compiler tab. Next, we will configure Remix to use files from the local storage.
You will need to install remixd using the following command:
npm install -g remixdWhen the installation is done, you can create a folder where you will put your Solidity files, then run the following command to tell Remix to use files from your folder:
remixd -s <shared folder> — remix-ide https://remix.ethereum.org
Now go to the home page of Remix and click on “Connect to localhost,” then select “Connect” in the pop-up, and you should see an area called localhost under the “File explorer” tab. If you expand it, you will see all the files contained in the folder you shared from your local storage:

Congratulations! Now you have the tools to start writing your first smart contract.
Wait… shouldn’t we install something to interact with the Ethereum blockchain? Not for now. We will start easy. Remix will provide you with a sandbox blockchain that runs in your browser to use it for deploying your contracts and interacting with them. Just make sure you select Javascript VM as the environment in the “Deploy and run” tab.
Writing Your Hello World Contract
Let’s see how our first smart contract will look:

SPDX license identifier
Trust in smart contract can be better established if the source code is available. Since making source code available always touches on legal problems with regards to copyright, the Solidity compiler encourages the use of machine-readable SPDX license identifiers. Every source file should start with a comment indicating its license. TK (https://solidity.readthedocs.io/en/v0.7.3/layout-of-source-files.html)
Version Pragma
Source files can (and should) be annotated with a version pragma to reject compilation with future compiler versions that might introduce incompatible changes. TK (https://solidity.readthedocs.io/en/v0.7.3/layout-of-source-files.html)
The versions of releases that have breaking changes are always in the form 0.x.0 or x.0.0. In our example, the version of the compiler that can be used should be above or equal to 0.7.0 and less than 0.8.0 (this second condition is added by using ^). It is possible to specify more complex rules for the compiler version. These follow the same syntax used by npm.
The first two lines should be present in all your smart contract files.
In order to start writing your smart contract, you need to use the keyword contract followed by the name of the contract, then you can put your code between the curly brackets.
Enough talking, let’s create this hello world contract.
Create a new file in your shared folder called HelloWorldContract.sol and copy-paste the previous code. If you have checked the auto-compile option, it will compile the code automatically. If you didn’t, then make sure you check it and compile the code.
Now it’s time to deploy our first contract and interact with it.
Click on the “Deploy and run transactions” tab, then make sure that you have JavaScript VM selected in the environment and your contract name in the contract area. Once done, click on “Deploy.”
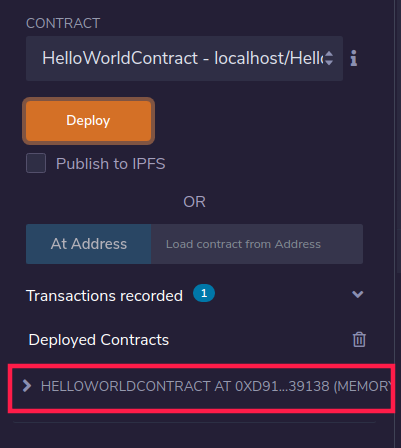
You should now see your contract under the “Deployed Contracts” area.
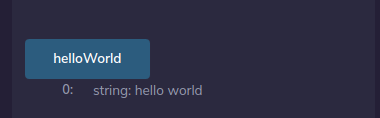
If you expand it, you will see the helloWorld function. Click on it in order to send a transaction that calls this function and you will see the hello world string printed.
Structure of a Smart Contract
Let’s see now what you can put inside your smart contract (below quoted directly from https://solidity.readthedocs.io/en/v0.6.7/structure-of-a-contract.html):
- State variables : Are variables whose values are permanently stored in contract storage.
- Functions : Functions are the executable units of code. Functions are usually defined inside a contract, but they can also be defined outside of contracts.
- Function Modifiers : Function modifiers can be used to amend the semantics of functions in a declarative way.
- Events : Events are convenience interfaces with the EVM logging facilities.
- Struct types : Structs are custom defined types that can group several variables.
- Enum types : Enums can be used to create custom types with a finite set of ‘constant values’.
We will see each of these components in more detail later.
That’s it for the introduction. See you in the next article!
